How To Use the Zyro Website Builder: A Beginner's Guide
The Zyro website builder is an intuitive site-creation and hosting platform that enables you to build a business site without writing any code. Its drag-and-drop functionality makes it easy to add elements to your site while its artificial intelligence (AI) features can help you develop content.
Yet, despite its intuitive interface, the Zyro website builder’s wide variety of options can sometimes seem a bit overwhelming — especially if you’ve never built a website before.
This guide provides step-by-step instructions on how to use the Zyro builder to customize your Zyro website to help your business increase its brand awareness and attract new customers.
Recommended: We encourage those new to Zyro to check out our How to Make a Zyro Website article first.
Signing up With Zyro
Go to Zyro.com and click on the “Get Started” button. Enter your email address, and then click on the “Continue” button. Next, create a password and click on the “Create Account” button.
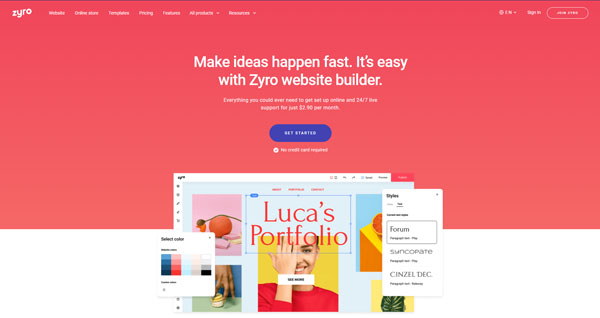
Using Zyro Templates
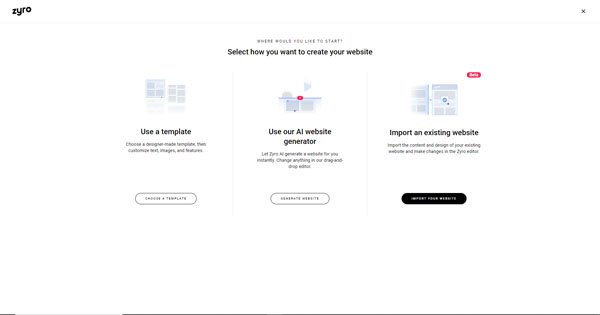
Zyro offers two website template options: a traditional selection of premade templates and AI-generated templates based on your specifications.
Using a Premade Template
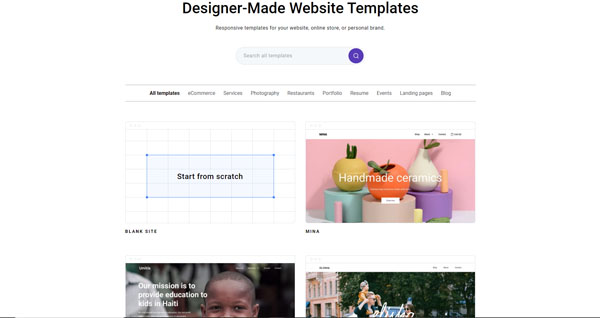
If you opt for the first option, Zyro has a wide variety of premade templates you can search through via keyword or category.
To select a premade template:
- Click on the “Choose a Template” button to reach a page that presents various premade template options.
![How to use Zyro.]()
- Search through the available templates by keyword in the search bar at the top of the page or by category via the tabs above the template images. Alternatively, choose a blank template if you want to start from scratch.
- Hover over a template photo until two buttons appear: “Start Building” and “Preview.”
- Click on the “Preview” button to view the entire template.
- click on the “Start Building” button once you select the template you want to use for your site.
Using Zyro’s AI Website Generator
If you’d rather take the second option, simply answer a few questions about the kind of website you need and Zyro’s AI website generator will create several template options specifically designed for you.
To use Zyro’s AI website generator:
- Click on the “Generate Website” button. This will open a page that asks, “What type of website are you building?” It also invites you to enter a website category in its search field. Find and click on the category that best matches your business.
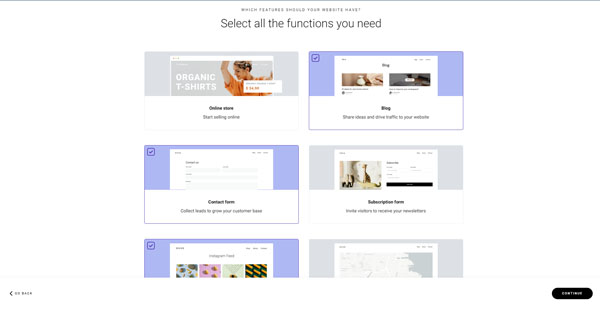
- The next page will ask, “Which features should your website have?” It’ll also invite you to select all the functions you need.
![How to use Zyro.]()
- Click on the checkbox in the upper-left corner of each feature you want your site to include from these options:
- Online Store
- Blog
- Contact Form
- Subscription Form
- Instagram Feed
- Maps
- Video
- Click on the “Continue” button in the lower-right corner.
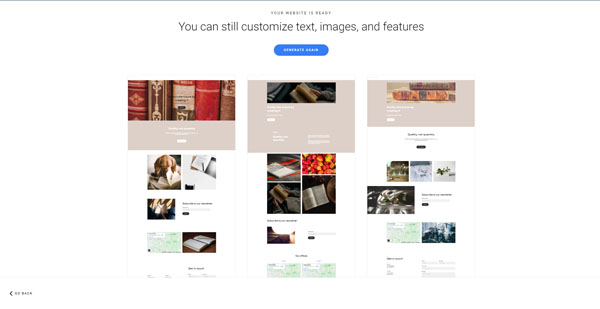
- The next page will present you with three AI-generated site layouts. Select your preferred option by hovering over it and clicking on the “Choose this design” link that’ll appear at the top.
Changing a Template’s Color Scheme
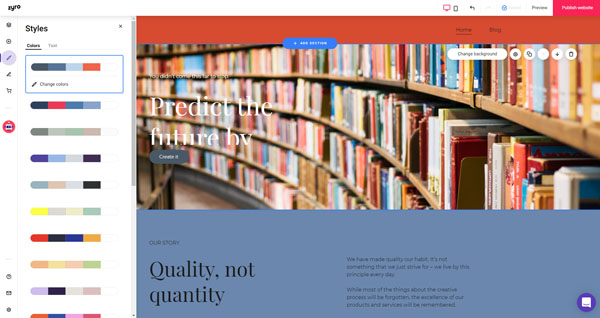
Once you choose a template, you can adjust its built-in elements like its overall color scheme. To learn more about why a cohesive color scheme is important, refer to our How to Choose a Great Website Color Palette guide.
To change a template’s color scheme:
- Click on the “Paintbrush” icon — third from the top — in the dashboard’s far-left toolbar. A “Styles” menu will then open with several color palette options.
- Click on the option you want to use.
- Next, click on the “Change Colors” link that appears below your chosen color palette.
Adjusting Elements on Zyro
With the Zyro website builder, you can easily adjust key elements of your site to create an eye-catching online presence for your business.
Changing the Fonts
You also may want to adjust the fonts built into your template to better align your website with your business’s branding. If you need help choosing the right font for your website, check out our Best Website Fonts guide.
To change a font:
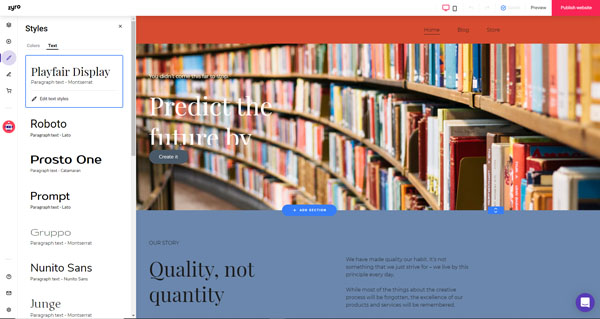
- Click on the “Paintbrush” icon in the dashboard’s far-left toolbar to open the “Styles” menu.
- Click on the “Text” tab at the top of this menu.
- Choose and click on your preferred font.
![How to use Zyro.]()
- To set one font for headings and another for paragraphs, click on the “Edit Text Styles” link under your chosen font.
- Set a different font for each type of text or select a different font for each heading or paragraph and the navigation menu.
Editing the Buttons
Zyro makes it easy to adjust the appearance of your website’s call-to-action (CTA) buttons.
To edit a button:
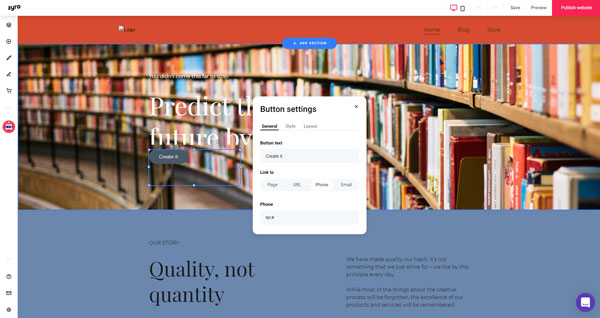
- Click on the button, and then click on the “Edit Button” button that appears at the top. This’ll open a “Button Settings” menu with three tabs: “General,” “Style,” and “Layout.”
![How to use Zyro.]()
- Use the “General” tab to change the text that appears inside the button and set the link to which the button leads.
- Use the “Style” tab to set the color of the button and its text.
- Use the “Layout” tab to control where in the block the button appears.
Adjusting Headers on Zyro
In addition to adjusting your site’s fonts and CTA buttons, you’ll likely want to change the content and appearance of its headers.
Customizing the Homepage Header
Tailoring your site’s homepage header can help you showcase your business’s brand assets and engage visitors.
To customize the homepage header
- Click on the header to make four editing buttons appear.
- Use the “Edit Navigation” button to make changes to the navigation bar. (We’ll discuss this in greater detail later in this guide.)
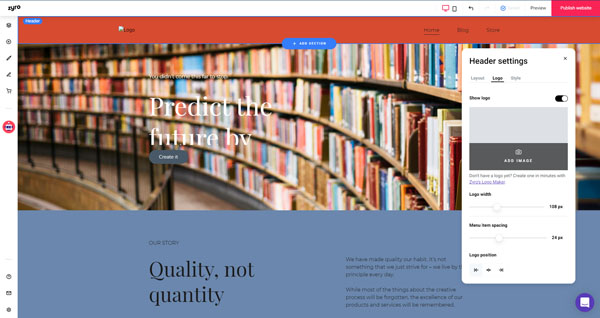
- Use the “Change Logo” button to add your business logo.
- Click on the slider next to the “Show Logo” link, and then drag and drop a logo image from your computer, search for a logo file on your computer, or choose a free image provided by Zyro.
Note: If you don’t yet have a logo, Zyro’s Logo Maker will help you design one. Simply click on the link below the “Add Image” button.
Changing a Header Background
You also can adjust the background of each header on your Zyro website, if desired.
To change a header background:
- Click on the header.
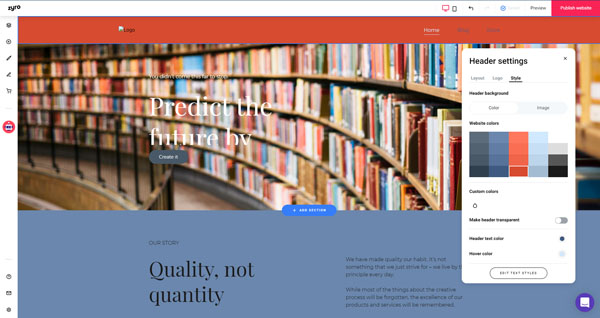
- Click on the “Paintbrush” icon to open the “Header Settings” menu.
- Under the “Style” tab in this menu, choose the background color you want to use for the header.
- Alternatively, you can make a header transparent by adjusting the toggle next to “Make Header Transparent.”
- Below that, you can control the color of the text within the header as well as an alternate text color when visitors hover over that text.
Adding Photos to Headers
The Zyro website builder also enables you to use a photo vs. a solid color as a background for headers.
To add a photo background to a header:
- Click on the header.
- Click on the “Paintbrush” icon to open the “Header Settings” menu.
- Under the “Style” tab in this menu, click on the “Image” tab in the “Header Background” section.
- Click on the “Add Image” button.
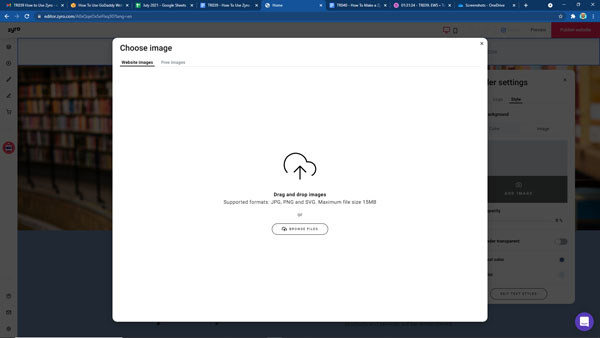
- A “Choose Image” window will then appear from which you can drag and drop a photo or click on the “Browse Files” button to insert a photo from your computer.
![How to use Zyro.]()
- Alternatively, you can select a royalty-free image from Zyro’s wide selection by clicking on the “Free Images” tab on the “Choose Image” window.
- Use the search bar to find relevant photos.
- Click on the image you want to use, and then click on the “Add Image” button beneath that photo.
Making Other Header Adjustments
In addition, you can adjust several other aspects of your website’s headers — from their position and spacing to their height.
To make other changes to a header:
- Click on the header.
- Click on the “Paintbrush” icon to open the “Header Settings” menu.
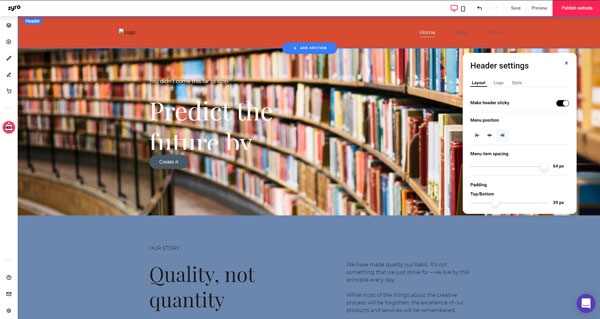
- Make sure you’re on the “Layout” tab in this menu.
![How to use Zyro.]()
- If you want to make the header “sticky,” meaning it stays in place as visitors scroll down a page, turn the toggle next to “Make Header Sticky” into the “on” position.
- Adjust where header items appear (e.g., on the far left, centered, or on the far right of the header) by using the arrows under the “Menu Position” section.
- Adjust the amount of space between menu items by using the slide bar under the “Menu Item Spacing” section.
- Adjust the height of your header by using the slide bar under the “Padding” section.
Setting up Pages and Site Navigation in Zyro
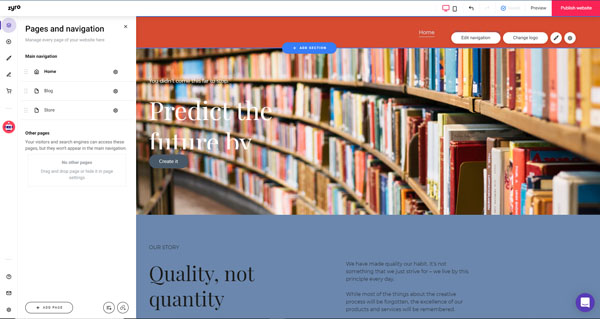
Customizing the pages and navigation bar on your Zyro website is simple. The “Pages and Navigation” icon — at the top of the dashboard’s far-left toolbar — gives you control of this aspect of your site.
Adding Pages
If your website template doesn’t include all the pages your site needs, it’s easy to add more.
To add a page:
- Click on the “Pages and Navigation” icon in the dashboard’s far-left toolbar to open the “Pages and Navigation” menu.
- Click on the “+ Add Page” button at the bottom of this menu.
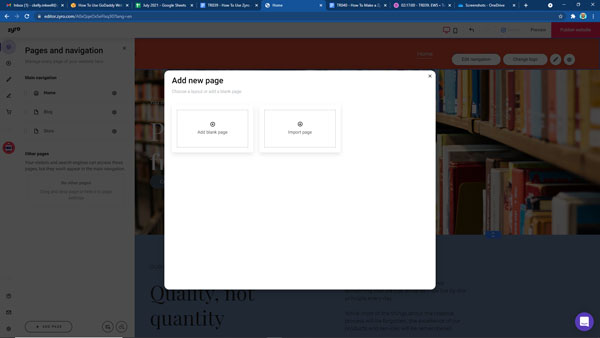
- Next, click on the “Add Blank Page” box.
![How to use Zyro.]()
- The new page will then open and the Zyro website builder will add it to the “Main Navigation” section of the “Pages and Navigation” menu.
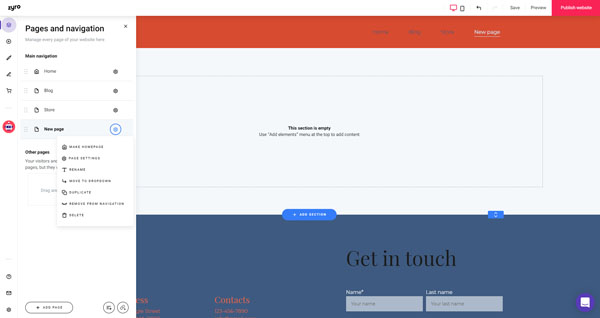
- To rename the page, click on the “Gear” icon next to “New Page” under the “Main Navigation” section of this menu.
![How to use Zyro.]()
- Choose the “Rename” option from the drop-down menu, and then enter the name you want to use for your new page.
- To position the page where you want it to appear on your site’s navigation bar, simply drag and drop it into place on the “Pages and Navigation” menu.
Reordering the Navigation Bar
You can use a simple drag-and-drop process to adjust the order in which your site’s pages appear in its main navigation bar.
To reorder the navigation bar:
- Click on the “Pages and Navigation” icon in the dashboard’s far-left toolbar to open the “Pages and Navigation” menu.
- Click on the page you want to move, and then drag it into your preferred position on the navigation bar.
Adding Pages to a Drop-Down Menu
Like reordering the pages of the navigation menu, it’s easy to move pages into drop-down menus beneath your website’s main navigation items.
To add pages to a drop-down menu:
- Click on the “Pages and Navigation” icon in the dashboard’s far-left toolbar to open the “Pages and Navigation” menu.
- Click on the page you want to add to a drop-down menu, and then drag and drop it directly under the page you want to contain that drop-down menu.
- Next to the name of the page you want to add to the drop-down menu, click on the “Gear” icon.
- Choose the “Move to Dropdown” option from the drop-down menu.
Deleting Pages
Again, the Zyro website builder makes this task very easy.
To delete a page:
- Click on the “Pages and Navigation” icon in the dashboard’s far-left toolbar to open the “Pages and Navigation” menu.
- Next to the name of the page you want to remove, click on the “Gear” icon.
- Choose the “Delete” option from the drop-down menu.
Working With Sections in Zyro
Sections are blocks of content on your website. They form the “building blocks” of a page and contain media, text, and CTA buttons, among other elements.
Adding Sections
With Zyro, you can easily add and customize new sections.
To add a section:
- Hover your cursor near the border between the sections where you want to add a new section.
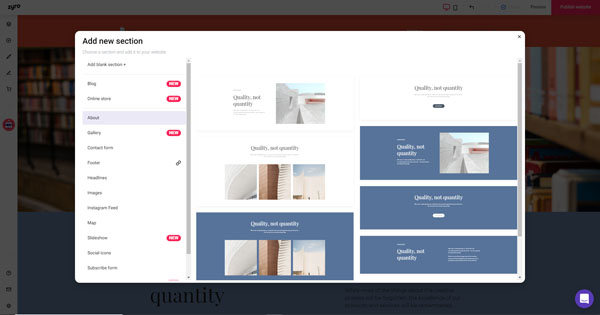
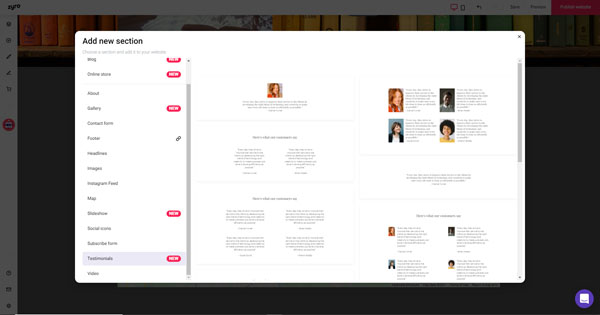
- Click on the “+ Add Section” button that appears to open the “Add New Section” window.
- Click on the type of section you want to add from the options on that window:
- Blank section
- Blog
- Online Store
- About
- Gallery
- Contact Form
- Footer
- Headlines
- Images
- Instagram Feed
- Map
- Slideshow
- Social Icons
- Subscribe Form
- Testimonials
- Video
- Click on the layout you prefer from the available options for that type of section. The new section will then appear on your page.
![How to use Zyro.]()
- Edit the new section’s text, media, and background to your satisfaction, using the steps outlined above.
Deleting Sections
You also can quickly remove any sections built into your chosen template that your site doesn’t need.
To delete a section:
- Click on the section you want to delete.
- Click on the “Trash Can” icon that appears in the upper-right corner of the section.
Changing Section Backgrounds
Just like header backgrounds, section backgrounds can feature a solid color or an image.
To use a solid color:
- Click on the section.
- Click on the “Change Background” button to open the “Style” menu.
- Under the “Color” tab, you can choose a solid color from your site’s color palette for the background.
- Alternatively, you can choose another color by clicking on the “Teardrop” icon under the “Custom Colors” section.
To use a photo saved on your computer:
- Move from the “Color” tab to the “Image” tab on the “Style” menu.
- Click on the “Add Image” button.
- A “Choose Image” window will then appear from which you can drag and drop a photo or click on the “Browse Files” button to insert a photo from your computer.
To use a royalty-free photo from Zyro:
- Click over to the “Free Images” tab on the “Choose Image” window.
- Use the search bar to find relevant photos.
- Click on the image you want to use, and then click on the “Add Image” button that’ll appear beneath that photo.
Moving Sections
Want to change the location of a section on a page within your site? That takes just a few easy steps.
To move a section:
- Click on the section you want to move. Six buttons will then appear in the upper-right corner of that section.
- To move the section up, click on the “↑” button (the upward-pointing arrow).
- To move the section down, click on the “↓” button (the downward-pointing arrow).
Editing Text Characteristics
The Zyro website builder enables you to change multiple characteristics of the text within content sections — from its color to its alignment.
To edit text characteristics:
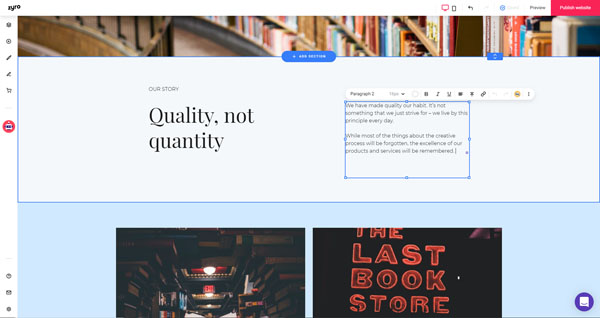
- Click on the box of text you want to edit. Three buttons will then appear above the text box.
- Click on the “Edit Text” button to open a toolbar.
- Use this toolbar to change your text’s:
- Status (e.g., paragraph, heading, etc.)
- Color
- Style (e.g., bolded, italicized, underlined)
- Alignment
- Position
- Capitalization
![How to use Zyro.]()
- You also can use this toolbar to add a link to your text or generate recommended wording using Zyro’s AI functionality.
Changing an Image
You can either upload your own image files or select images from Zyro’s library of royalty-free stock photos.
To change an image:
- Click on the image. Three buttons will then appear above the image.
- Click on the “Change Image” button to open a menu.
- Choose the “Replace Image” option on that menu.
- A “Choose Image” window will then appear from which you can drag and drop a photo or click on the “Browse Files” button to insert a photo from your computer.
- To instead use a royalty-free photo from Zyro’s wide selection, click over to the “Free Images” tab on the “Choose Image” window.
- Then, use the search bar to find relevant photos.
- Click on the image you want to use, and then click on the “Add Image” button that’ll appear beneath that photo.
Adding and Editing Buttons
It’s easy to customize the CTA buttons on your Zyro website.
To add a button:
- Click on the “+” icon in the dashboard’s far-left toolbar to open the “Add Element” menu.
- Click on the “Button” box in that menu, drag it over to your web page, and then drop it in your desired location.
To edit a button:
- Click on the button you want to edit.
- Click on the “Edit Button” button that’ll appear above it to open an editing menu with three tabs: “General,” “Style,” and “Layout.”
- Use the “General” tab to change the text that appears inside the button and set the link to which the button leads.
- Use the “Style” tab to set the color of the button and its text.
- Use the “Layout” tab to control where in the block the button appears.
Working With Images and Other Media on Zyro
With its drag-and-drop functionality, the Zyro website builder makes adding and adjusting media elements a very simple process.
Adjusting Images
Beyond adding images to various sections of your Zyro website, you also can change the properties of each image.
To add an image:
- Click on the “+” icon in the dashboard’s far-left toolbar to open the “Add Element” menu.
- Click on the “Image” box in that menu, drag it over to your web page, and then drop it in your desired location.
- An “Image Settings” menu will automatically open next to the new image.
- Choose the “Replace Image” option on that menu.
- A “Choose Image” window will then appear from which you can drag and drop a photo or click on the “Browse Files” button to insert a photo from your computer.
- To instead use a royalty-free photo from Zyro’s wide selection, click over to the “Free Images” tab on the “Choose Image” window.
- Then, use the search bar to find relevant photos.
- Click on the image you want to use, and then click on the “Add Image” button that’ll appear beneath that photo.
To change an image’s properties:
- Click on the image.
- An “Image Settings” menu will automatically open next to the image with three tabs: “Image,” “Action,” and “SEO.”
- Use the “Image” tab to choose another photo and/or change the “Image Position” — whether it’ll “Fit” so the entire photo displays or show a cropped version to “Fill” the box.
- Use the “Action” tab to choose what’ll happen when visitors click on the image from these three options: “Nothing,” “Open Full-Screen Preview,” or “Open Link.”
- Use the “SEO” tab to add “Alt Text” that describes the photo for search engine optimization (SEO) purposes.
Adding a Photo Gallery
The Zyro website builder provides two ways to add a photo gallery to your website.
To add a gallery with its own section:
- Hover your cursor near the border between the sections where you want to insert the new section.
- Click on the “+ Add Section” button that appears to open the “Add New Section” window.
- Click on the “Gallery” option from the list of section types.
- Click on the layout you prefer from the available options for photo galleries. The new gallery will then appear on your page.
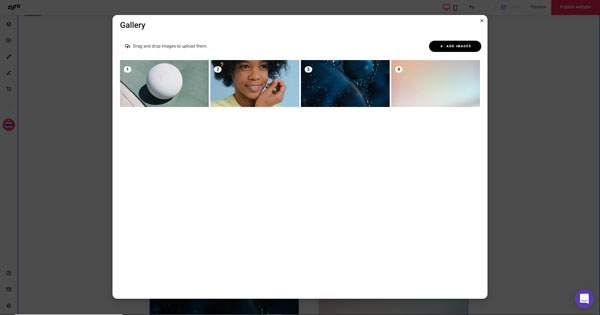
- Click on the new photo gallery. When a series of four buttons appear above it, click on the “Manage Gallery” button.
- A new window will then open from which you can use the “+ Add Images” button to add the images you want your gallery to include.
![How to use Zyro.]()
- Delete the placeholder photos automatically added by Zyro by hovering your cursor over each photo, and then clicking on the “Trash Can” icon that appears in the upper-right corner of each photo.
To add a gallery to an existing section:
- Click on the “+” icon in the dashboard’s far-left toolbar to open the “Add Element” menu.
- Click on the “Gallery” box, drag it over to your web page, and then drop it in your desired location.
- Click on the new photo gallery. When a series of four buttons appear above it, click on the “Manage Gallery” button.
- A new window will then open from which you can use the “+ Add Images” button to add the images you want your gallery to include.
- Delete the placeholder photos automatically added by Zyro by hovering your cursor over each photo, and then clicking on the “Trash Can” icon that appears in the upper-right corner of each photo.
Uploading Videos
The steps required to add video content to your Zyro website resemble those needed to add a photo gallery.
To upload a video:
- Click on the “+” icon in the dashboard’s far-left toolbar to open the “Add Element” menu.
- Click on the “Video” box, drag it over to your web page, and then drop it in your desired location.
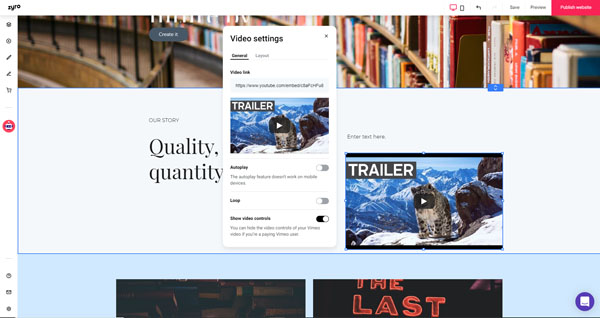
- Three buttons will automatically appear above the video. Click on the “Edit Video” button to open the “Video Settings” menu.
- Under the “Video Link” section of this menu, enter the URL for the video you want to use.
- Next, use this menu to adjust the video’s settings to “Autoplay” and/or “Loop.”
Connecting With Website Visitors Using Zyro
The Zyro website builder offers several ways to help your business connect with its online visitors, including social media links, Instagram feeds, subscription forms, and contact forms.
Adding Social Media Icons
Linking your website to your business’s social media accounts can help you boost engagement with potential customers.
To add a social icon:
- Click on the “+” icon in the dashboard’s far-left toolbar to open the “Add Element” menu.
- Click on the “Social Icons” box, which looks like the Facebook logo.
- Drag it over to your web page and drop it in your desired location.
To link social icons to your social media feeds:
- Click on the “Social Icons” box.
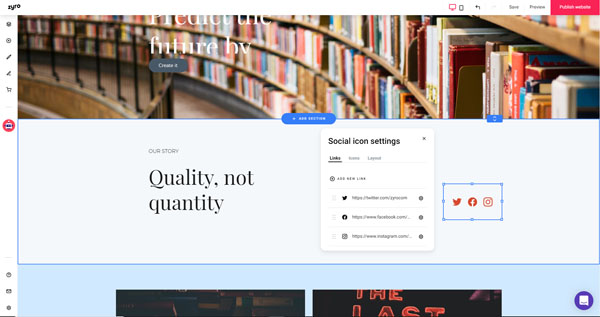
- Three buttons will then appear above that box. Click on the “Edit Social Icons” button to open the “Social Icon Settings” menu.
- On this menu, click on the “Gear” button by the social media icon to which you want to add a link.
![How to use Zyro.]()
- Choose the “Edit” option from the drop-down menu that appears, and then enter the URL for your social media account.
To add other social media icons:
- Click on the “Social Icons” box.
- Three buttons will then appear above that box. Click on the “Edit Social Icons” button to open the “Social Icon Settings” menu.
- On this menu, click on the “+ Add New Link” button.
- Enter the URL for your additional social media account.
To adjust the size and color of social media icons:
- Click on the “Social Icons” box.
- Three buttons will then appear above that box. Click on the “Edit Social Icons” button to open the “Social Icon Settings” menu.
- On this menu, click on the “Icons” tab.
- Adjust the “Icon Size” with the slide bar.
- Click on the circle next to “Icon Color” to choose a color.
To control where icons appear within the “Social Icons” box:
- Click on the “Social Icons” box.
- Three buttons will then appear above that box. Click on the “Edit Social Icons” button to open the “Social Icon Settings” menu.
- On this menu, click on the “Layout” tab.
- Use the toggle switch next to “Display Icons Vertically” to align the icons vertically or horizontally.
- Use the “Icon Spacing” buttons to determine how far apart the icons will appear.
- Use the arrows under the “Alignment” section to establish where in the icon box the icons will appear (e.g., at the top, on the bottom, or centered).
Embedding an Instagram Feed
The Zyro website builder also enables you to directly embed your business’s Instagram feed on your site.
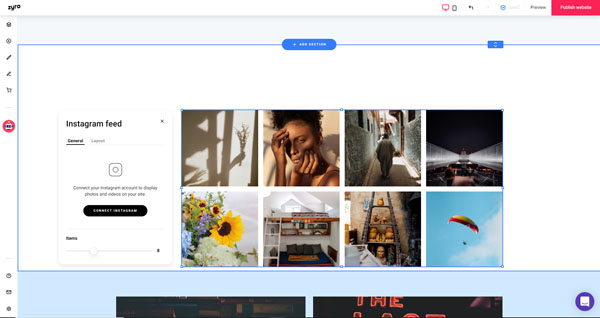
To embed an Instagram feed:
- Add a new section to your page per the “Adding Sections” section above.
- Click on the “+” icon in the dashboard’s far-left toolbar to open the “Add Element” menu.
- Click on the “Instagram Feed” box, drag it over to your web page, and then drop it into the new section.
- Click on the new “Instagram Feed” box. Three buttons will then appear above that box.
- Click on the “Edit Feed” button.
- A new editing menu will then open next to the feed.
![How to use Zyro.]()
- Under the “General” tab, click on the “Connect Instagram” button to link your website to your Instagram account.
- Use the slide bar at the bottom of this tab to set the number of items you want to appear on your feed.
- Under the “Layout” tab, use the sliders to determine the number of “Items Per Row” and the size of the “Gap Between Photos” in your feed.
Adding an Email Subscription Form
Opt-in email subscriptions provide a great way for your business to stay connected with existing and potential customers.
To add an email subscription form:
- Click on the “+” icon in the dashboard’s far-left toolbar to open the “Add Element” menu.
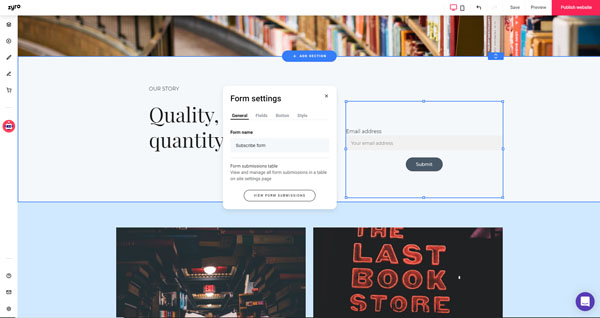
- Click on the “Subscribe” box, drag it over to your web page, and then drop it in your desired location. The new subscription box will automatically include a space for users to enter an email address as well as a “Submit” button.
To add more fields to a subscription form:
- Click on the subscription form.
- Three buttons will then appear above the form.
- Click on the “Edit Form” button to open the “Form Settings” menu next to the form.
![How to use Zyro.]()
- Click on the “Fields” tab.
- Click on the “+ Add New Form Field” link.
- You can add the following types of fields to your form:
- Name
- Phone
- Text Field
- Text Box
Adding a Contact Form
Contact forms enable online visitors to easily reach your business.
To add a contact form:
- Click on the “+” icon in the dashboard’s far-left toolbar to open the “Add Element” menu.
- Click on the “Contact Form” box, drag it over to your web page, and then drop it in your desired location.
To add more fields to a contact form:
- Click on the contact form.
- Three buttons will appear above the form.
- Click on the “Edit Form” button to open the “Form Settings” menu next to the form
- Click on the “Fields” tab.
- Click on the “+ Add New Form Field” link.
- You can add the following types of fields to your form:
- Name
- Phone
- Text Field
- Text Box
Adding Customer Reviews or Testimonials in Zyro
Showcasing positive reviews or testimonials on your Zyro website can help your business build credibility with potential customers and encourage them to try your products or services.
To add customer reviews or testimonials:
- Hover your cursor near the border between the sections where you want to insert the new section.
- Click on the “+ Add Section” button that appears to open the “Add New Section” window.
- Click on the “Testimonials” option from the list of section types.
![How to use Zyro.]()
- Click on the layout you prefer from the available options for testimonial sections.
To update the placeholder text in a testimonial section:
- Click on the text box you want to update.
- Three buttons will then appear above the text box.
- Click on the “Edit Text” button.
- Delete the placeholder text and type in the wording you want to display.
Editing the Footer in Zyro
Beyond editing the information contained in your site’s footer, the Zyro website builder also enables you to customize several of its design features.
To edit the footer:
- Click on the footer.
- Six buttons will then appear in the upper-right corner of the footer.
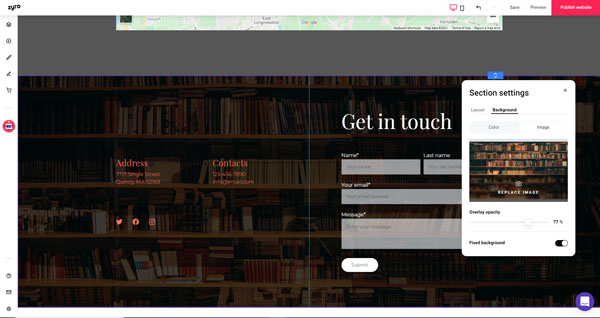
- Click on the “Gear” button to open the “Section Settings” menu.
- Under the “Layout” tab, you can ”Enable/Disable Grid Gaps” with a toggle switch as well as set the footer’s height.
- Under the “Background” tab, you can choose a solid color or photo for the footer’s background, set the “Overlay Capacity” with a slider bar, and opt to use a “Fixed Background” with a toggle switch.
Previewing and Publishing Your Website Using Zyro
Once you finish making customizations to your Zyro website, it’s time to preview and publish it on the internet.
To preview and publish your website:
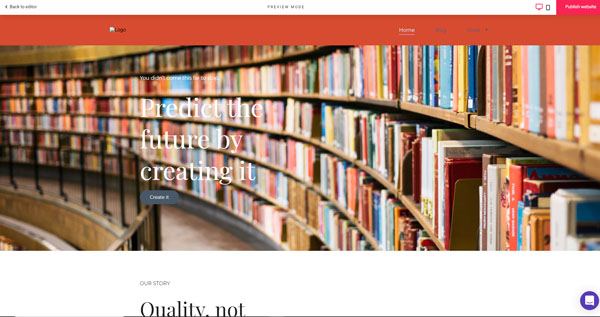
- Click on the “Preview” link in the upper-right corner of the dashboard to view your website as it’ll appear to desktop computer users.
![How to use Zyro.]()
- Click on the “Phone” icon in the upper-right corner of the “Preview Mode” screen to instead see your site as it’ll appear to mobile device users.
- If you need to make any additional changes, click on the “Back to Editor” link in the upper-left corner of the “Preview Mode” screen.
- If your website is ready to go live, click on the “Publish Website” button in the upper-right corner.
Final Thoughts
Hopefully, this guide proved helpful as you worked to customize your Zyro website to represent your company well. Feel free to bookmark this page so you can return to it, should you ever need to troubleshoot updating or adding more features to your Zyro business website.
Try Zyro
Zyro makes it easy to create a functional and advanced business website in a short amount of time. Get started with a free domain and a money-back guarantee by clicking the button below.
