How To Use the Webnode Website Builder: A Beginner’s Guide
The Webnode website builder offers a straightforward, easy-to-use platform that can be an excellent choice for some small business owners.
Webnode also provides an extensive knowledge bank that shows users how to perform easy to advanced web development tasks. But, knowing how to add advanced functionality to your business site can be difficult to troubleshoot. Here, we will show you how to enhance your Webnode website.
Still looking for the right website builder for you? Check out our Best Website Builder of 2024 guide for more insights.
Signing up With Webnode
If you haven’t done so already, the very first thing you need to do is sign up with Webnode.
During this process, you’ll select your website type, purchase (or transfer) your domain, and select a site template. You can find detailed instructions for signing up with Webnode in our How To Make a Webnode Website guide.
We also encourage you to upgrade to one of the premium plans so you can take advantage of all the core and bonus features Webnode offers. To learn more about Webnode’s pricing tiers, check out our Webnode Website Builder Review.
Still need a domain for your website? Use our free Domain Name Generator to get started.
Purchasing a Domain Through Webnode
When you sign up for a Webnode premium package, you’ll receive free domain registration for a year. If you want to purchase a new domain name for your website or purchase a domain for your Webnode Limited plan, follow these simple steps:
Option A:
- From the “My Projects” area of the Webnode dashboard, click on the “Administration” tab.
- Click on the “Domain Management” menu option.
- Click on the “Register a new domain” button.
- Follow the prompts to finish registering — and paying for — your new domain.
Option B:
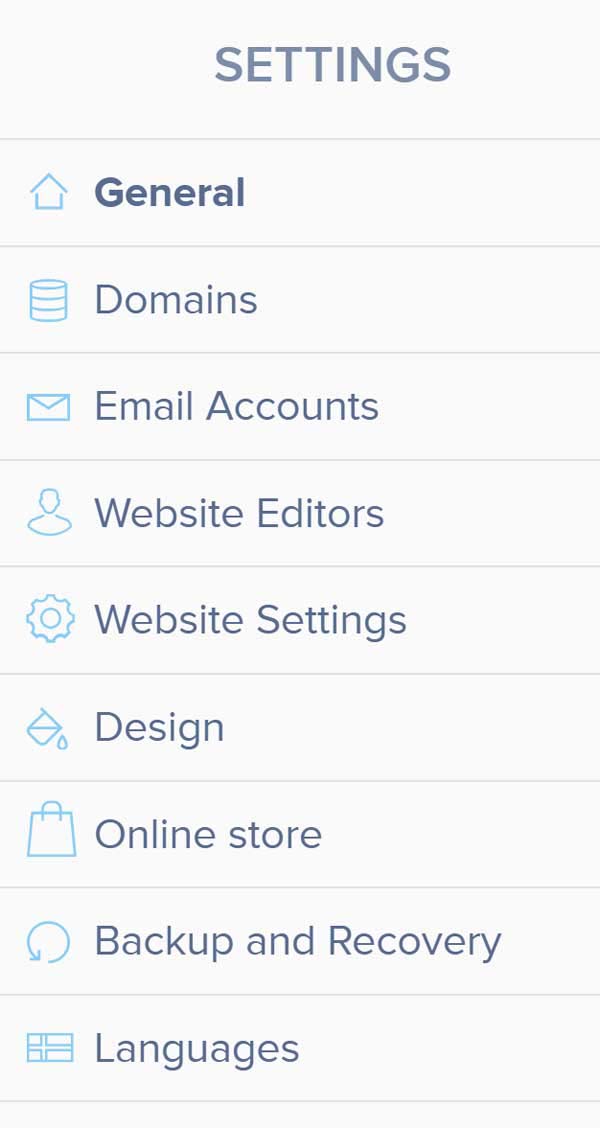
- From the website editing page, click on the “Settings” icon.
![How to use Webnode.]()
- Click on the “Domains” menu option.
- Click on the “Register a new domain” button.
- Follow the prompts to finish registering — and paying for — your new domain.
Transferring a Domain to Webnode
If you already purchased a domain name for your small business, you have the option of transferring it to Webnode. The advantage of doing so is that you’ll then have the ability to manage your website and domain registration with one company.
To transfer an existing domain to Webnode:
- From the website editing page, click on the “Settings” icon.
- Click on the “Domains” menu option.
- Click on the “Use existing domain” link.
- Follow the prompts to finish transferring your domain and pay for any additional fees (if applicable).
Assigning a Registered Domain to a Webnode Website
If you already purchased a domain name for your small business and you don’t want to transfer it to Webnode, you can still assign your registered domain to your Webnode website. If you purchased a premium Webnode package and wish to attach an existing domain name to your new Webnode website, that’s easy to do.
To attach an existing domain to your Webnode website:
- From the website editing page, click on the “Settings” icon.
- Click on the “Domains” menu option.
- Click on the “Manage domains” link.
- Click on the “Transfer your domain” button.
- Scroll down the page until you reach the “Need Help?” section
- Expand the help item titled, “Can I use my own domain without transferring it to Webnode?”
- Click on the “Here” link.
- Enter the domain name you wish to transfer, when prompted.
- Click on the “Add domain” button.
- View the DNS settings provided and follow the steps to finish updating the DNS record with your domain registrar.
Using Webnode Templates
When you first sign up with Webnode, you must select a template for your website. Once selected, you can’t change your website’s template. But, you do have the ability to customize it to meet your business needs.
Check out some other Webnode websites for inspiration in our Webnode Website Examples article.
Changing a Template’s Accent Color
At the template level, you can change your website’s accent color. This complementary color appears on text you specify through the advanced settings.
Learn more about why a cohesive color scheme is important for your business website and branding. Read our How to Choose a Great Website Color Palette guide for more.
To change your template’s accent color:
- From your website’s editing page, click on the “Settings” icon.
![How to use Webnode.]()
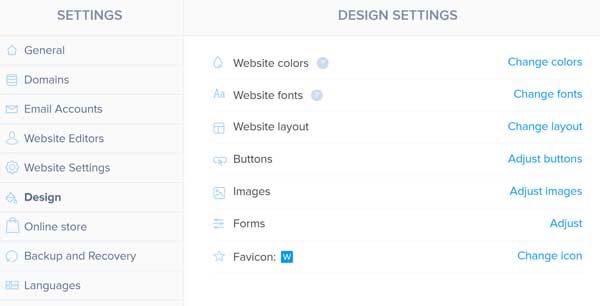
- Click on the “Design” menu option.
![How to use Webnode.]()
- Under the “Design Settings” section, click on the “Change colors” option.
![How to use Webnode.]()
- You’ll then return to your homepage view and a “Color settings” menu will appear at the top of the page.
![How to use Webnode.]()
- Click on the drop-down arrow to the right of the color block.
- Select a new accent color.
- Click on the “Advanced settings” button to specify where the accent color should appear.
- When finished, click on the “Save changes” button.
Changing the Fonts
Much like accent colors, the Webnode website builder also makes it easy to change the global fonts assigned to your website. Make sure you have the best font for your website and branding with our helpful guide.
To change your website’s fonts:
- From your website’s editing page, click on the “Settings” icon.
- Click on the “Design” menu option.
- Under the “Design Settings” section, click on the “Change fonts” option.
- You’ll then return to your homepage view and a “Font settings” menu will appear at the top of the page. Click on the drop-down font menu to select a new font.
- When finished, click on the “Save changes” button.
Customizing the Buttons
The Webnode website builder also lets users adjust their button settings so they appear uniform in shape, size, and design.
To adjust your button settings:
- From your website’s editing page, click on the “Settings” icon.
- Click on the “Design” menu option.
- Under the “Design Settings” section, click on the “Adjust buttons” option.
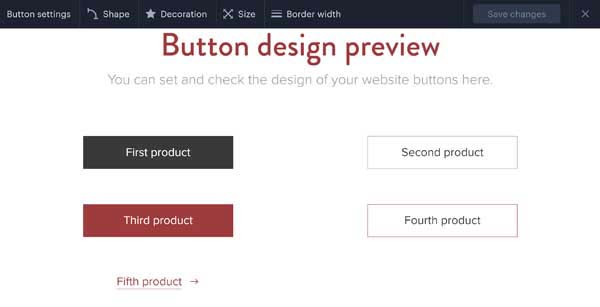
- You’ll then return to your homepage view and a “Button settings” menu will appear.
- Use the shape, decoration, size, and border width options to adjust your buttons to meet your needs.
![How to use Webnode.]()
- When finished, click on the “Save changes” button.
Modifying the Images
You also can use the Webnode website builder to modify your image settings so they appear uniform in shape, size, and overall design.
To modify the image settings:
- From your website’s editing page, click on the “Settings” icon.
- Click on the “Design” menu option.
- Under the “Design Settings” section, click on the “Adjust images” option.
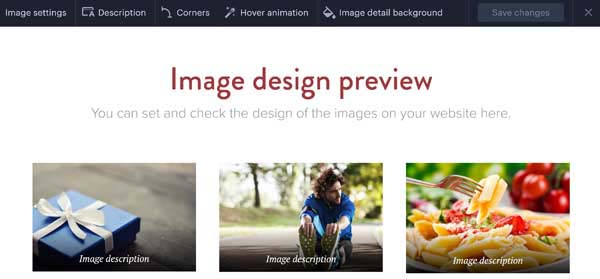
- You’ll then return to your homepage view and an “Image settings” menu will appear.
- Use the description, corners, hover animation, and image detail background options to edit your images to meet your needs.
![How to use Webnode.]()
- When finished, click on the “Save changes” button.
Customizing the Homepage Header in Webnode
All Webnode website templates come with a standard header that includes an icon, logo, and navigation menu. You can then use the header customization tools to change the appearance and functionality of this section.
Make sure your homepage has everything you need to be successful. Be sure to read our How to Design a Homepage guide.
To upload your business logo:
- From your website’s editing page, click on the “Settings” icon.
- Click on the website’s logo in the upper-left corner of the screen. A pop-up menu will then appear, asking you to choose either “Logo” or “Format.”
- Click on the “Logo” option.
- Another prompt will then ask you to choose between two more options: “Change logo” or “Remove logo.”
- Click on the “Change logo” option.
- Choose an image by clicking on the “+ Upload image” link in the upper-right corner of the screen.
![How to use Webnode.]()
- Find the business logo file (on your computer or server) you want to upload, and then click on the “Open” button.
- After verifying your upload was successful, click on the “Close” button.
Note: Don’t have a custom logo for your business yet? Check out our Free Logo Generator and create a logo today!
Making Additional Homepage Header Adjustments
Because the homepage header section of any website plays an essential role in the overall user experience (UX), all small business owners should ensure this header is on-brand and supports their website’s purpose.
The Webnode website builder provides two primary homepage header elements: the “Navline” and the “Claims” and “Content” sections.
- “Navline” refers to the header section that includes the logo, title, and navigation menu.
- “Claims” and “Content” both refer to the section directly below the “Navline.” This section may include an image, a call to action (CTA), a heading, a subhead, and more.
Changing the Header Type
Webnode website owners can choose from three options for their header type: “Navline Only,” “Navline & Claims,” or “Navline & Content.” To decide which header type is best for your website, select each type to see how it’ll look with the rest of your content.
To change your website’s header type:
- Place your cursor over your website’s navigation bar to make a “Settings” icon appear.
![How to use Webnode.]()
- Click on the “Settings” icon.
- Click on the “Header Type” menu option.
- Select the header type most appropriate for your business.
- When finished, click on the “Publish” icon to save your changes and republish your site.
Changing the Header Image or Color
Webnode website owners also have the ability to change the color or image displayed behind the “Navline” and “Claims” or “Content” sections of their websites.
To change your website’s “Navline” and “Claims” or “Content” section’s image or color:
- Place your cursor over your website’s navigation bar to make a “Settings” icon appear.
- Click on the “Settings” icon.
- Choose the “Navline background” menu option to update the “Navline” image or color.
- Choose the “Section background” menu option to update the “Claims” or “Content” image or color.
- Follow the prompts to make your desired image or color changes.
- When finished, click on the “Publish” icon to save your changes and republish your site.
Setting up Webnode Navigation and Pages
Because your small business website likely will contain several pages, you’ll rely on your site’s navigation menu to direct visitors to the pages they seek. That means you’ll need to ensure you have a clear menu and submenu structure, which may include adding and deleting pages.
Modifying Your Website Page Structure
All Webnode website builder templates include a number of standard pages. Depending on the template you choose, you may need to add, delete, or rearrange the pages to create a clear structure for your site.
To edit your site’s page navigation, click on the “Pages” icon at the top of your screen (it may appear on the right or left side of the screen).

You’ll then have access to the “Pages” menu from which you can add, edit, and delete pages as well as reorder your navigation menu.

To delete a page:
- In the left sidebar of the “Pages” menu, click on the name of the page you wish to delete.
- Click on the “Delete Page” link from the options that then appear.
- Click on the “Delete” button to confirm your action.
- If you’re finished editing your navigation menu, click on the “Close” button.
- If you’re also done making changes to your website, click on the “Publish” icon to save your changes and republish your site.
To add a page:
- Click the “+ Add page” link in the upper-right corner of the “Pages” menu.
- Choose a page template, and then click on the “Choose” button beneath that template.
- Enter a name for your new page.
- Click on the “Create” button.
- If you’re finished editing your navigation menu, click on the “Close” button.
- If you’re also done making changes to your website, click on the “Publish” icon to save your changes and republish your site.
To rename a page:
- In the left sidebar of the “Pages” menu, click on the name of the page you wish to edit.
- Click on the text bar that includes the page’s name.
![How to use Webnode.]()
- Type a new name for the page.
- If you’re finished editing your navigation menu, click on the “Close” button.
- If you’re also done making changes to your website, click on the “Publish” icon to save your changes and republish your site.
To reorder your navigation menu:
- In the left sidebar of the “Pages” menu, simply drag and drop pages until they appear in the appropriate order.
- If you’re finished editing your navigation menu, click on the “Close” button.
- If you’re also done making changes to your website, click on the “Publish” icon to save your changes and republish your site.
Changing the Menu Type
If you want to customize your “Navline” and/or navigation menu even further, follow these simple steps.
To change your menu type:
- Place your cursor over the navigation menu bar to make a “Settings” icon appear.
![How to use Webnode.]()
- Click on the “Settings” icon.
- Click on the “Advanced settings” link.
- Select the “Navline settings” menu option.
- Select the “Menu type” menu option.
- Select one of the available menu types:
- “Classic
![How to use Webnode.]()
- “Centered”
![How to use Webnode.]()
- “Bottom”
![How to use Webnode.]()
- “Boxed Hamburger”
![How to use Webnode.]()
- “Hamburger"
![How to use Webnode.]()
- “Classic
Working With Webnode Sections
As you populate your website’s pages, you’ll work with content blocks that the Webnode website builder refers to as sections. Each page features a number of sections that come in a variety of formats. First, we’ll show you basic instructions to add a section. Then, we’ll provide additional instructions for using and editing popular section types.
Adding a Section
The Webnode website builder offers a number of premade sections that website owners can use to build their webpages.
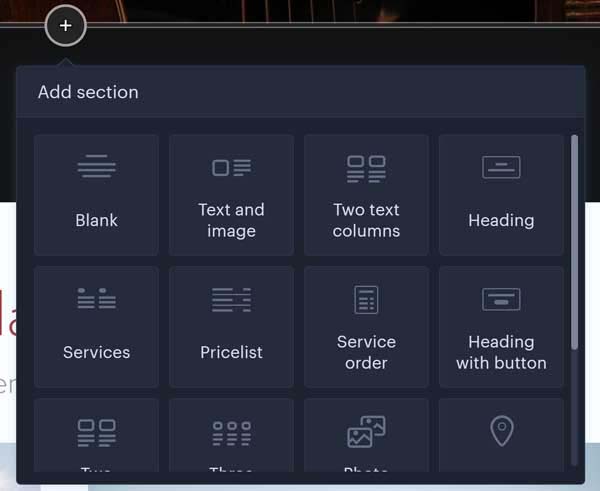
To add a section:
- Hover your cursor over the area where you want to insert a section until you see the plus sign (“+”) icon appear.
![How to use Webnode.]()
- Click on the plus sign (“+”) icon.
- Select the type of section you’d like to insert from the available options.
![How to use Webnode.s]()
- Once you successfully insert your new section, edit it as needed.
Changing a Section’s Background
Editing the background of your sections can make your website more visually appealing. Doing so also can alert visitors that the content in a specific section differs from others on the same page.
To change a section’s background color or image:
- Hover your cursor over the section you’d like to edit until you see the “Settings” icon appear.
- Click on the “Settings” icon.
- Click on the “Section background” link.
- Choose from one of the prepopulated background options.
- If none of them meets your needs, click on the plus sign (“+”) icon to access more options. You can choose from a range of pre-installed images, colors, and patterns or upload your own image or video.
- If you’re finished editing the section, click on the “Close” button.
- If you’re also done making changes to your website, click on the “Publish” icon to save your changes and republish your site.
Customizing a Content Section
After you add a new content section to your Webnode website, you might want to edit its settings. Beyond changing a section’s background, you also have the ability to modify the content section’s width and border.
To modify a content section’s width or border:
- Hover your cursor over the section you’d like to edit until you see the “Settings” icon appear.
- Click on the “Settings” icon.
- Click on the “Advanced settings” link.
- Change the section’s width, as desired, or toggle the “Decorative border” radio button to the “On” or “Off” position.
- If you’re finished editing the section, click on any part of your screen outside the “Settings” menu.
- If you’re also done making changes to your website, click on the “Publish” icon to save your changes and republish your site.
Working With Images and Media in Webnode
The Webnode website builder permits users to upload a variety of media files to their website (up to 400 megabytes with a premium package), including:
- Images (.jpg, .jpeg, .png, .gif, and .bmp)
- Documents (.pdf, .doc, .docx, .ppt, .pptx, .pps, .ppsx, and more)
- Video (.avi, .wmv, .mov, and .mpg)
- Audio (.mp3, .wma, .wav, and .ogg)
Adding Images
The best way to add an image to your Webnode website is to add a section that includes an image placeholder, such as a “Text and image,” “Photo gallery,” or “Portfolio” section.
To add an image:
- Hover your cursor over the area where you’d like to insert a section until you see the plus sign (“+”) icon appear.
- Click on the plus sign (“+”) icon
- Select the type of section you’d like to insert from the available options.
- Webnode will automatically insert your new section with placeholder text and images.
- Click on the image you’d like to change.
- From the pop-up toolbar that then appears, click on the “Edit” button.
- Click on the “Replace” button.
- Select a new image from the Webnode media library or follow the steps to upload an image file from your device.
- If you’re done making changes to your website, click on the “Publish” icon to save your changes and republish your site.
Inserting Videos
The Webnode website builder allows users to insert videos already uploaded to Vimeo or YouTube.
To insert a video:
- Hover your cursor over the area where you’d like to insert a section until you see the plus sign (“+”) icon appear.
- Click on the plus sign (“+”) icon.
- Select the “Video” option.
- Paste in the link to the video you’d like to insert.
- Click on the “OK” button.
- If you’re done making changes to your website, click on the “Publish” button to save your changes and republish your site.
Connecting With Website Visitors
The Webnode website builder provides several ways for business owners to connect with their site visitors. Two of the most popular ways to connect with target audiences include:
- Creating a contact form
- Adding an email subscription form
Creating a Contact Form
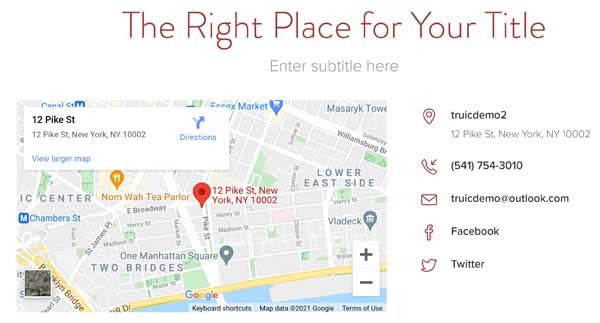
While the most popular place to use a contact form is on a website’s Contact page, you actually can include a simple contact form anywhere on your Webnode website.
To add a contact form:
- Hover your cursor over the area where you’d like to insert the contact form until you see the plus sign (“+”) icon appear.
- Click on the plus sign (“+”) icon.
- Select the “Contact” option.
![How to use Webnode.]()
- Update the heading, subhead, street address, phone number, email address, and social links.
- To edit the map, simply click on the map, enter your business address, and then press the “Enter” button on your keyboard.
- If you’re done making changes to your website, click on the “Publish” button to save your changes and republish your site.
Adding an Email Subscription Form
Many business owners also include an email subscription form on their website. This allows them to collect email addresses of their current and potential customers so they can send them business updates and marketing emails.
To add an email subscription form:
- Hover your cursor over the area where you’d like to insert the subscription form until you see the plus sign (“+”) icon appear.
- Click on the plus sign (“+”) icon.
- Select the “Newsletter registration” option.
![How to use Webnode.]()
- Update the form, as desired.
- If you’re done making changes to your website, click on the “Publish” button to save your changes and republish your site.
Adding Testimonials in Webnode
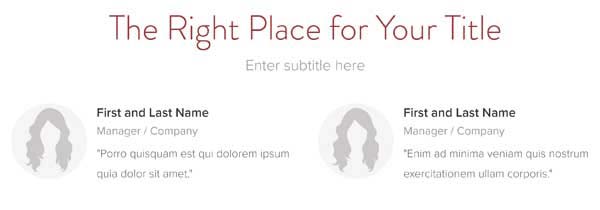
Although you can’t automatically embed testimonials and reviews to your Webnode website, you can add them manually.
To manually add testimonials:
- Hover your cursor over the area where you’d like to insert the testimonials section until you see the plus sign (“+”) icon appear.
- Click on the plus sign (“+”) icon.
- Select the “Testimonials” option.
![How to use Webnode.]()
- Update the content, as needed.
- If you’re done making changes to your website, click on the “Publish” button to save your changes and republish your site.
Editing the Footer in Webnode
Although Webnode users have a limited ability to change the content in their website’s footer, they can still customize it to meet their branding needs.
To edit the footer:
- In the website footer area, click on the “Settings” icon.
- Follow the prompts to update the footer type and section background.
- To change the text, simply highlight the text you wish to edit and start typing.
- If you’re done making changes to your website, click on the “Publish” button to save your changes and republish your site.
Final Thoughts
Hopefully, this guide proved helpful as you further customized your Webnode website. Be sure to bookmark this page so you can return to it, should you need to add more functionality to your Webnode business site.
For more information and how-to guides, visit the Webnode Help Center or our How To Make a Webnode Website guide.
Want more information on Webnode? Check out these other useful articles:


