How To Use WordPress.com: A Step-by-Step Guide
Achieving your website’s goals will require a business website that’s attractive and easy to use. If you just started to build your WordPress.com website or want to update your business’s current WorPress.com site, look no further. Our free guide will show you how to use WordPress.com so you can learn to customize a WordPress.com website, use WordPress.com plugins, and manage WordPress.com pages, posts, categories, and files.
This guide includes step-by-step instructions that’ll show you how to take your WordPress.com website to the next level through layout, functionality, and design changes.
Make sure your WordPress.com website has everything it needs. Check out our How to Build a Website guide to learn more.
Signing up With WordPress.com
If you haven’t already signed up with WordPress.com, you’ll need to do so before you can build and edit your site. Find detailed instructions for this in our How To Make a WordPress.com Website guide.
Changing a WordPress.com Theme
It’s relatively easy to change a WordPress.com theme — and you can do so in one of two ways. You can select a new theme from the WordPress.com library or you can choose to upload a theme you acquire externally.
Keep in mind that switching themes isn’t always easy or seamless. We recommend you restore WordPress.com’s “Coming Soon” feature before you start this process. Simply click on the “Settings” and then the “General” buttons on the WordPress.com dashboard before selecting the “Coming Soon” option under the “Privacy” section.
To choose a new theme from the WordPress.com library:
- From the WordPress.com dashboard, click on the “Appearance” link and then the “Themes” link.
- Browse through the free (and premium) themes in this library to find one that suits your business.
- Once you select a theme, you can preview, install, and activate it on your website.
To upload a new theme from an external marketplace:
- Purchase and download the theme files from the third-party vendor.
- Return to the WordPress.com dashboard.
- Click on the “Appearance” link and then the “Themes” link.
- Click on the “Install Theme” button.
- Click on the “Upload Theme” button.
- Click on the “Choose File” button.
- Find where you saved your theme’s files (i.e., its ZIP file), select that ZIP file, and then click on the “Open” button.
- Click on the “Install Now” button.
- Once your new theme finishes installing, click on the “Activate” link.
Find the best themes on the market with an Envato subscription. Get started with an Envato free trial to see what it has to offer for you.
Managing a WordPress.com Media Library
The WordPress.com Media Library enables users to manage all their media files, including adding, editing, and deleting files. WordPress.com supports a wide variety of file types, including portable document format (PDF), joint photographic experts group (JPEG), moving picture experts group layer-3 Audio (MP3), and more.
To access the WordPress.com media library:
- From the WordPress.com dashboard, select “Media” and then “Library.”
- From the Media Library, you can:
- Add new media files.
- Delete media files.
- Leverage the “Bulk Select” feature to delete multiple files at once.
- Select a specific media file and edit its alternative (ALT) text, caption, title, or description.
- View a specific file’s uniform resource locator (URL).
Adding PDF Files To WordPress.com Posts and Pages
At some point, you might want to include a PDF file on a specific page or blog post within your website. Before doing so, you must first determine exactly how you want the PDF to appear: either as a button or a hyperlink within a specific line of text.
To add a PDF link and button (which will appear on a separate line):

- Enter the editing environment of the specific page or blog post to which you want to add the PDF file.
- Click on the specific block within that page or post where you want to add the PDF file.
- Click on the plus sign (“+”) icon (the one labeled “Add block”).
![How to Use WordPress.com.]()
- Select the “File” block.
- Upload your PDF file (or select it from the Media Library if you previously uploaded it there).
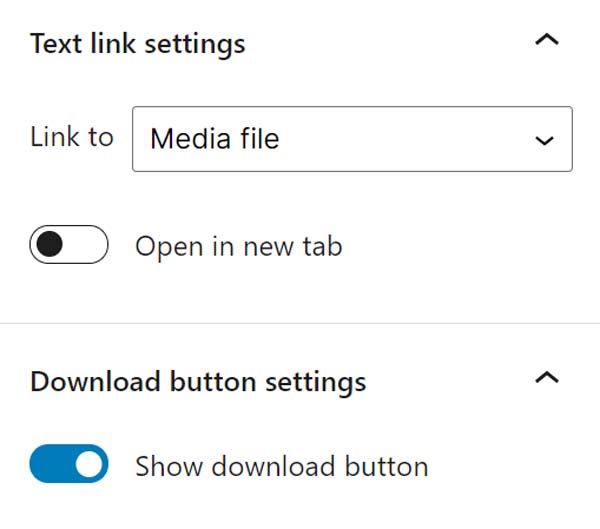
- After you insert the PDF file, adjust the settings as needed.
![How to Use WordPress.com.]()
- Turn the “Open in new tab” radio button to the “on” position if you want the PDF to open in a new browser tab.
- Turn the “Show download button” radio button to the “on” position if you want to make the PDF file downloadable with the click of a button.
- After you add the PDF file, click on the page or post’s “Preview” option and review your changes.
- If you like how the PDF appears, click on the “Save” button (if the page or post is in draft form) or the “Update” button (if the page is live) to save your changes.
To add a link to a PDF file within a line of text:

- Visit your WordPress.com Media Library and upload the PDF file there.
- Next, select your newly uploaded PDF file.
- Copy the file’s URL.
- Access the editing environment for the appropriate page or post.
- Highlight the applicable text to place the hyperlink.
- Click on the “Hyperlink” button.
- Paste the PDF file’s URL into the appropriate box.
- If you want the PDF file to open in a browser tab, turn the “Open in new tab” radio button to the “on” position.
- Press the “Enter” key on your keyboard.
- Click on the “Preview” option to view the changes and ensure the PDF hyperlink appears as expected.
- If you like how the hyperlink appears, click on the “Save” button (if the page or post is in draft form) or the “Update” button (if the page is live) to save your changes.
Adding and Editing a WordPress.com Navigation Menu
A website’s navigation menu gives online visitors a direct set of links that’ll take them to different areas of the site. The overwhelming majority of WordPress.com websites house their navigation menus in horizontal bars at the top of each page. Your navigation menu represents a crucial aspect of your website’s structure because it’ll help visitors locate content on your site more easily.
Your menu and menu customization options may vary slightly, depending on the theme you choose for your WordPress.com website. For this WordPress.com demo site, we installed the “Astra” theme and will show you how to edit its top navigation menu.

To edit an existing WordPress.com navigation menu:
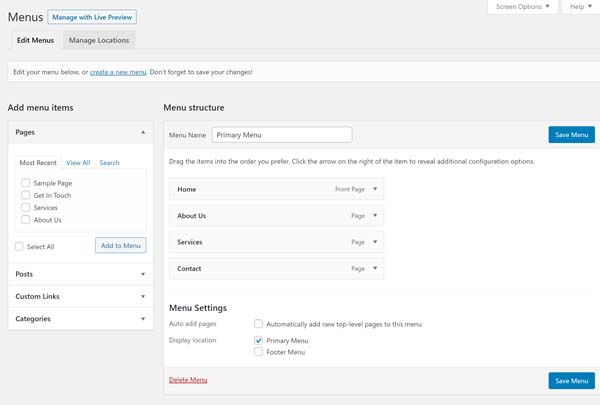
- From the WordPress.com dashboard, select “Appearance” and then “Menus.” From the “Menus” screen, you can:
![How to Use WordPress.com.]()
- Update the “Menu Name” to “header menu,” “top menu,” or “main menu”, depending on your preference.
- Add additional pages to your menu by checking the box next to the relevant page name(s) and then clicking on the “Add to Menu” button.
- Add custom links and categories to your menu.
- Use the menu’s drag-and-drop feature to rearrange the order of your menu items.
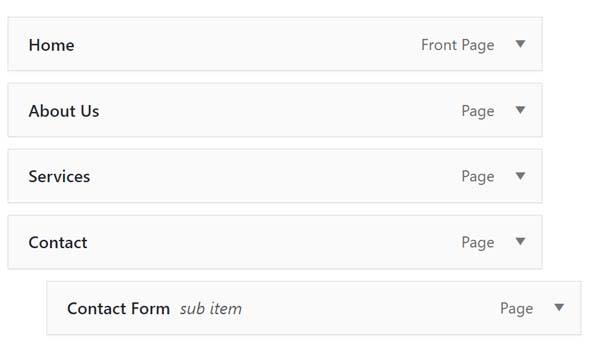
- Create a submenu by dragging a menu item slightly to the right of the primary menu item.
![How to Use WordPress.com.]()
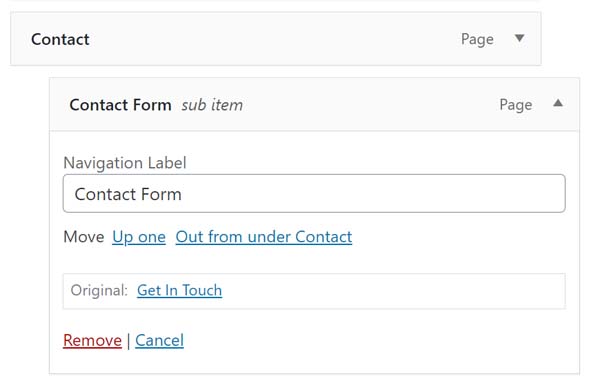
- Update the name of individual menu items by clicking on the expand arrow (“▼”) to the right of each menu item.
![How to Use WordPress.com.]()
- After you finish editing your menu, click on the “Save Menu” button.
To add a new WordPress.com menu:
- From the WordPress.com dashboard, select “Appearance” and then “Menu.”
- Select the “create a new menu” link.
- Enter a memorable “Menu Name” like “top menu” or “main menu.”
- Adjust the menu settings, as needed.
- Click on the “Create Menu” button.
- Add additional pages to your menu by checking the box next to the relevant page name(s) and then clicking on the “Add to Menu” button.
- Add custom links and categories to your menu.
- Use the menu’s drag-and-drop feature to rearrange the order of your menu items.
- Create a submenu by dragging a menu item slightly to the right of the primary menu item.
- After you finish editing your menu, click on the “Save Menu” button.
The vast majority of WordPress.com themes allow users to place menus in a variety of locations. Experiment with different menu placements and configurations to find the right combination for your website.
Using WordPress.com Plugins
There are thousands of plugins available to install on your WordPress.com website. If you haven’t done so already, check out our Best Plugins for a WordPress Site article to learn which plugins work well for most WordPress websites. While your site may include some pre-installed plugins, you might want to consider installing some of these popular plugins as well.
Duplicating Pages in WordPress.com
Most WordPress.com themes don’t include page duplication (or cloning) right out of the box. If your chosen theme doesn’t have this ability, you can install a simple plugin to add this functionality.
To install a WordPress.com page duplication plugin:
- From the WordPress.com dashboard, select “Plugins” and then “Add New.”
- Enter “duplicate” in the plugin search box.
- Select a plugin that not only meets your needs, but also is compatible with your version of WordPress.com and theme.
- Click on the “Install Now” button.
- Click on the “Activate” button.
- After you fully install the plugin, you’ll see the option to “duplicate” or “clone” pages and posts directly from the “Pages” or “Posts” sections of the WordPress.com dashboard.

Hiding Featured Images in WordPress.com
Some popular WordPress.com themes — like “Elementor,” “Astra,” and “WPBakery” — include this functionality, but many WordPress.com themes don’t. If you require this functionality, you can simply install a plugin.
To install a WordPress.com plugin to hide featured images:
- From the WordPress.com dashboard, select “Plugins” and then “Add New.”
- Enter “hide featured image” in the plugin search box.
- Select a plugin that not only meets your needs, but also is compatible with your version of WordPress.com and theme.
- Click on the “Install Now” button.
- Click on the “Activate” button.
- After you fully install the plugin, you’ll see the option to “hide the featured image” on a specific page or post.
Adding Google AdSense To WordPress.com
If you have a Google AdSense account, follow these simple steps to connect it to your WordPress.com website.
To connect Google AdSense to a WordPress.com site:
- From the WordPress.com dashboard, select “Plugins” and then “Add New.”
- Enter “Site Kit by Google” in the plugin search box.
- Click on the “Install Now” button.
- Click on the “Activate” button.
- After you fully install the plugin, you’ll automatically return to the “Plugins” page.
- Select “Site Kit” from the left sidebar.
- Follow the prompts to connect your Google account, set up Site Kit, and connect to Google AdSense.
Protecting Your WordPress.com Site
As a website owner, you’re responsible for the security of your site and its contents. In addition to ensuring your WordPress.com site, its theme, and plugins remain updated and installing a secure sockets layer (SSL) certificate, you’ll most likely want to add a security-based plugin as well.
To install a WordPress.com security plugin:
- From the WordPress.com dashboard, select “Plugins” and then “Add New.”
- Enter “security” in the plugin search box.
- Select a plugin that not only meets your needs, but also is compatible with your version of WordPress.com and theme. For the purposes of this guide, we’ll demonstrate how to install the Wordfence plugin.
- Click on the “Install Now” button.
- Click on the “Activate” button.
- After you fully install the plugin, you’ll need to provide an email address to attach to your Wordfence account.
- Read Wordfence’s privacy policy and terms, and then check the box to indicate you accept them.
- Click on the “Continue” button.
- You’ll then reach a prompt that asks if you want to purchase the premium version of this plugin. Click on the “No thanks” link if you don’t wish to do so. If you choose to purchase the premium version, follow the prompts to complete your purchase, enter the premium key, and then click on the “Install” button.
- You can now access the Wordfence menu from the WordPress.com dashboard.
- Follow Wordfence’s instructions to finish configuring the plugin.
Speeding Up Your WordPress.com Site
Website loading speed plays a crucial role not only in delivering a positive user experience (UX), but also in search engine optimization (SEO). If your website doesn’t load fast enough, you may want to install a plugin to help speed it up.
To install a plugin to enhance your site’s page-loading speed:
- From the WordPress.com dashboard, select “Plugins” and then “Add New.”
- Enter “speed” in the plugin search box.
- Select a plugin that not only meets your needs, but also is compatible with your version of WordPress.com and theme. For the purposes of this guide, we’ll demonstrate how to install the WP-Optimize plugin.
- Click on the “Install Now” button.
- Click on the “Activate” button.
- After you finish installing the plugin, you can access the WP-Optimize menu from the WordPress.com dashboard. Continue configuring the plugin according to the developer’s instructions.
Using the WordPress.com Customizer
The WordPress.com Customizer will help you make additional changes to your homepage, navigation menu, and site-wide design.
Depending on your chosen theme, the WordPress.com Customizer will provide you with different options. Some WordPress.com themes rely heavily on the WordPress.com Customizer while others provide their own menus to deliver similar functionality.
Read on to learn how to use the WordPress.com Customizer to make changes to your homepage, headers, footer, and fonts with the options available for the “Astra” theme.
To edit headers:
- From the WordPress.com dashboard, select “Appearance” and then “Customize.”
- Choose the “Header Builder” menu item in the WordPress.com Customizer.
- To update your logo, title, and tagline, click on the “Site Identity & Logo” option.
- Click on the “Change Logo” button to upload your business’s logo. Portable network graphics (PNG) files are the best file type for logos. If you don’t have a logo for your business yet, check out our Free Logo Generator.
- Update your site’s title, tagline, icon, and additional header settings, as needed.
- Click on the open-angle bracket (“<”) icon to return to the main WordPress.com Customizer menu.
To edit the footer:
- Choose the “Footer Builder” menu item in the WordPress.com Customizer.
- Use the “Footer Builder” menu to add, edit, and move content and widgets around to create a custom footer for your website.
- Click on the open-angle bracket (“<”) icon to return to the main WordPress.com Customizer menu.
To edit site fonts and colors:
- Click on the “Global” menu item in the WordPress.com Customizer.
- To update the default fonts for your website, choose the “Typography” option.
- To update the main font your site uses for normal text on pages and blog posts, choose “Base Typography” and then update the font settings.
- To change the fonts your site uses for its headers, choose “Headings” and then update the font settings.
- To update your site’s default colors, choose “Colors” and then update the color settings.
- To update the default colors for all the buttons on your website, choose “Buttons” and then update the color settings.
- Click on the open-angle bracket (“<”) icon to return to the main WordPress.com Customizer menu.
Make sure you have cohesive branding. Use our guides to finding the right font and color palette for your business and website.
Editing WordPress.com Categories
You can assign WordPress.com categories to a post or page while you edit them, but you must follow different steps to edit your site’s categories.
To edit WordPress.com categories:
- From the WordPress.com dashboard, select “Posts” and then “Categories.”
- You’ll then reach the “Categories” admin panel. From there, you can easily add, delete, and edit your site’s categories.
Managing WordPress.com Users
As a small business owner, you may, at some point, want to grant another person access to your website to manage, edit, or add content to the site. Through the “Users” menu, you can add, edit, and delete user permission for your WordPress.com website.
To add a WordPress.com user:
- From the WordPress.com dashboard, select “Users” and then “Add New.”
- Fill out the form and choose the user’s role (e.g., administrator, author, contributor, or editor).
- Click on the “Send invitation” button.
To delete a WordPress.com user:
- From the WordPress.com dashboard, select “Users” and then “All Users.”
- Click on the user you wish to delete.
- Decide if you want to only delete the user or delete the user plus all content created by them.
- Click on the “Delete User” button.
To edit a WordPress.com user:
- From the WordPress.com dashboard, select “Users” and then “All Users.”
- Click on the user you wish to edit.
- Make the necessary changes.
- Click on the “Save Changes” button.
Managing WordPress.com Settings
A crucial aspect of maintaining your WordPress.com website includes managing a variety of back-end settings. Some of the most common back-end tasks include creating site maps, installing SSL certificates, and backing up your site. At some point, you also may want to change your site’s uniform resource locator (URL) structure and privacy settings.
Changing a WordPress.com Website’s Permalink Structure
Your website’s permalink structure plays an important role in your website’s SEO and the overall UX. If you ever need to update or change your website’s permalink (URL) structure, follow these simple steps.
To change your site’s permalink structure:
- From the WordPress.com dashboard, select “Settings” and then “Permalinks.”
- Choose one of the suggested permalink structures or create a “Custom Structure” to meet your needs.
- Click on the “Save Changes” button when you finish.
Making a WordPress.com Site Private
If you plan to make major changes to your WordPress.com website, you may want to temporarily make the entire site private — or unpublish it altogether. It’s a simple, straightforward process and, as a WordPress.com member, you have two ways to do this.
To make a website private:
- From the WordPress.com dashboard, select “Settings” and then “General.”
- Scroll down to the “Privacy” section.
- Choose from the three available options: “Coming Soon,” “Public,” or “Private.”
- Click on the “Save Settings” button.
- Once you finish updating your site, return to this section to begin showing your website to the public again.
Creating a WordPress.com Site Map
As a WordPress.com user, the Jetpack plugin comes pre-installed on your website. This plugin includes site map functionality you can use to submit to search engines.
To create a WordPress.com site map with Jetpack:
- From the WordPress.com admin panel, select “Jetpack” and then “Dashboard.”
- Click on the “Settings” tab in the upper-right corner of your screen.
- Click on the “Traffic” menu item.
- Scroll down to the “Sitemaps” section.
- Copy and paste your website’s site map URL into Google Search Console or another program.
Final Thoughts
Hopefully, this guide’s step-by-step instructions helped you successfully take your WordPress.com website to the next level. Be sure to bookmark this page so you can return to it if you ever need to troubleshoot managing your WordPress.com site.
To learn more about improving a WordPress.com website, check out these related articles:

